Comment

Do Your Feet Turn Out When Squatting or Running? (Updated 2024)

IMG_5033.jpg

You and Your Feet

The foot is most stable when it is straight. When your feet are turned out, the integrity of your foot's arch is not being maintained. The further out you rotate your foot, inherently it tends to get less stable. As you stress out the plantar fascia, the flat connective tissues (ligaments) that connect the heel bone to your toes, the transverse and longitude arch will collapse without external rotation.

(2024: While most of this holds biomechanically, it raises an important question about demands during your activity. Does it matter if you’re increasing physical activity? How about compared to a marathon runner? The demands you ask of your feet will greatly determine how much the “correct” biomechanics matter.)

It is important to keep your feet pointing forward while walking and stable while lifting. If turned out of alignment, the knee and ankle will be open and the hip therefore be unstable. Instability can lead to hip, knee, or ankle problems or even skeletal issues like bunions or chronic knee and/or back pain.

(2024: Goes back to the first new point, which is task dependent. If you’re lifting 300lbs versus picking up a 3lbs box, these little “malalignments” matter less the lighter the load. In general, the question I ask is, can you do both? In reality, the inability to do one likely matters means more to our health in the long run.)

Hips or Feet?

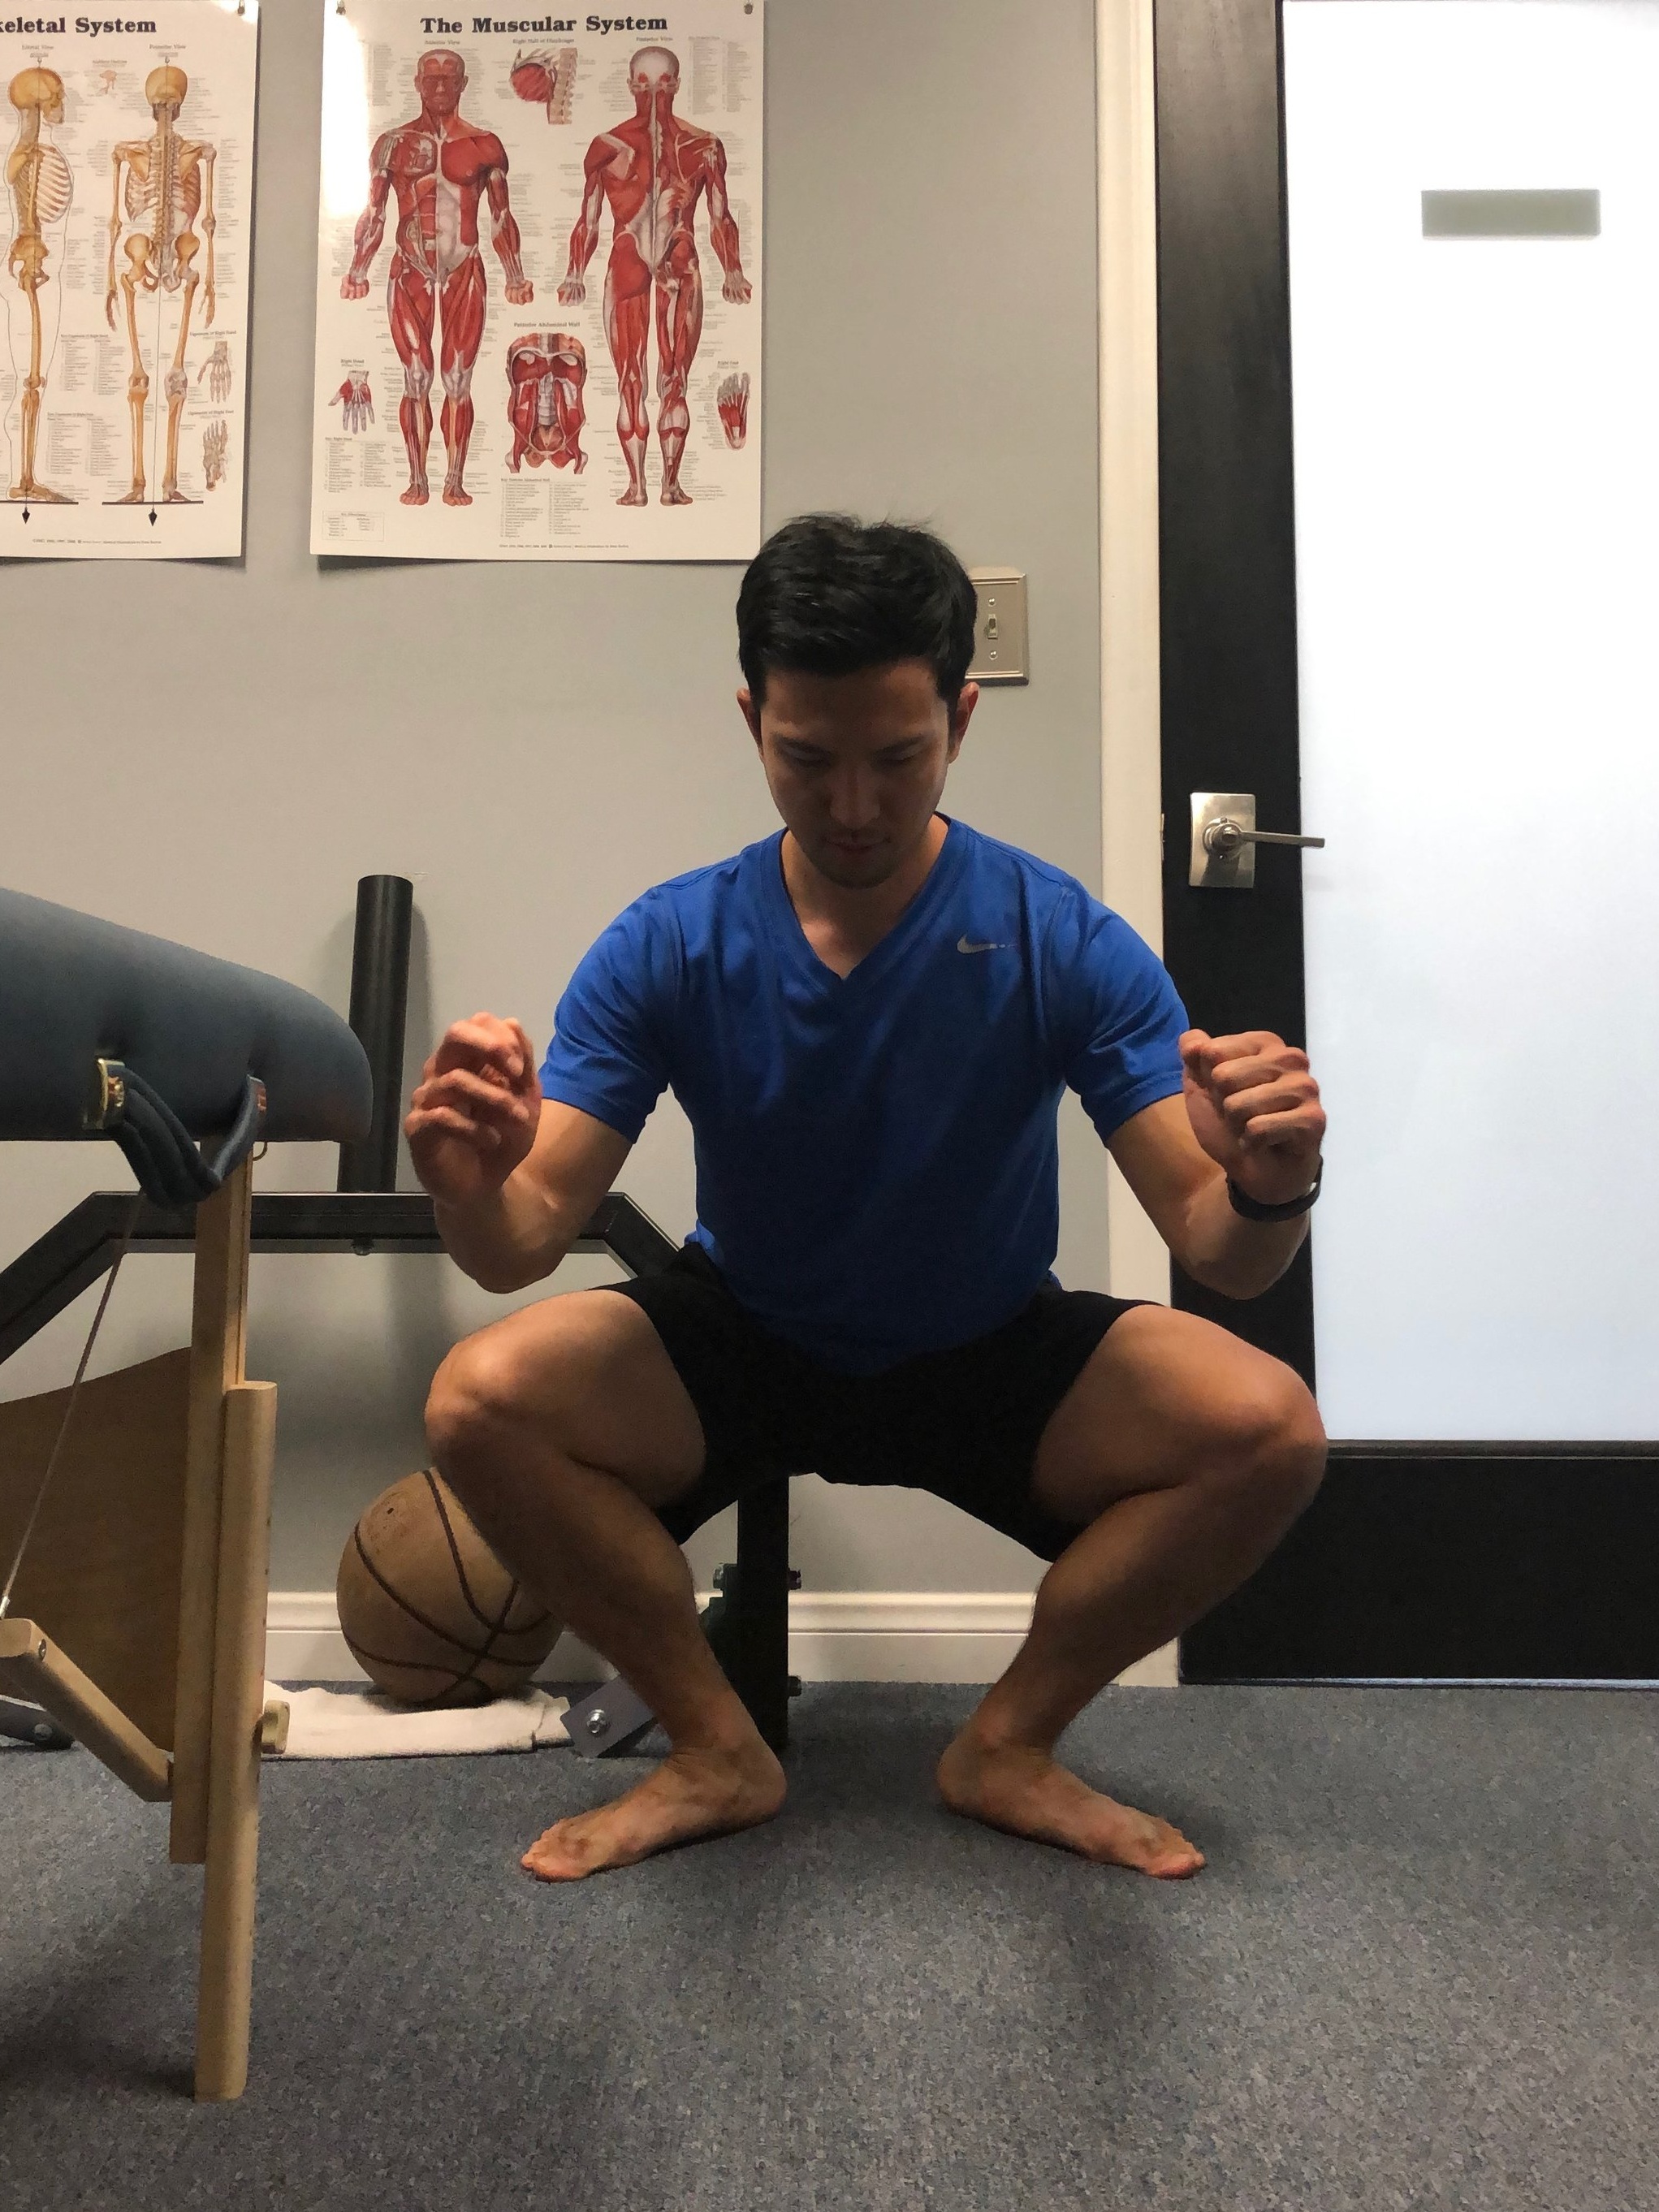
Is the root of the issue coming from your hips or feet being turned out? A simple test can be performed by looking at the single-leg squat.

  1. Set up a camera straight on

  2. Stand on one leg and drop into a single leg squat.

  3. Repeat on the other side.

Start by looking if any knee rotation occurs in or out but your feet appear relatively set. If so, the problem may be coming from your hips.

Do your knees remain stable, but your foot rotates in or out? Then it’s likely due to your feet.

Possibilities also include poor motor control, tight calves or an issue with your anterior tibialis (the muscle next to your shin).

The majority of cases I work with have exhibit some combination of the two.

(2024: All of that Is still solid advice in assessing the feet from the hips during an activity with increased stability demands.)

The Good News

The good news is that you can fix muscular imbalances and improve subsequent motor control discrepancies.

Walking

The most common way doctors choose to remedy this problem is with the use of orthotics. They artificially create stability through the feet, which works great until you have to shell out a good chunk of change for a new pair. An expensive solution to a problem that can be remedied by training the intrinsic foot muscles and improving internal hip rotation.

(2024: I am doubling down on the idea that too many doctors will refer to podiatry over consulting with a PT. This leads a patient down the rabbit hole of custom orthotics when in many cases, it could be resolved with intrinsic foot muscle strength work.)

Below is a whole post I created on Instagram around the topic:

View this post on Instagram

Build Stronger Feet 👣 - The initial shot shows maintaining a short foot-arch versus allowing the transverse arch to collapse. Collapse isn’t an issue, rather it’s uncontrollable collapse that is a problem. - Toe Control The ability to control your toes says a lot about the overall health of your feet and the muscles that cross the area. First begin by tapping the big toe up and down while maintaining the other four up. Then switch! Aim for controlled reps of 10. - Single Leg Balance Frontal Swings Taking the position from before maintaining your arch, now we add in movement making it more reactive in nature. Because the motion comes from the side, it’ll challenges you more dynamically. And dynamic stabilization is much more important because eventually you’ll have to test it out by running and cutting but initially this is where you begin building those intrinsic foot muscles. - Single Leg Balance and Reach An extension of the last exercise is a forward, side and backwards reach with the free leg. Good foot positioning allows the hip to do its job and by proxy aides proper alignment of the knee. - Concentrated Calf Raise Wall Nice and slow, we look to push through the ball of our foot up onto our toes, stabilizing via the big toe. If you can “stick” the position by pausing it’s a plus. - Single leg RDL w/ Band The band goes under the ball of your foot by the big toe. Proceed to add some tension to the band and perform SLRDLs. The goal is proper foot position, otherwise you’ll lose the band!

A post shared by Gary Heshiki (@garyheshiki) on

It’s All in the Hips

Practice standing, walking, and running with neutral feet.  People watching in public places and see who walks/runs neutral and who has funky movement.  If you can spot the error in others than you will be more cognizant of your own movements. In most cases, being aware of the issue is more than half the battle.

Organizing our feet is easier if you are in a braced position as well.

(2024: ehh….okay there were a lot of nocebo statements made back when I wrote this originally. Primarily the idea that you can have a wide range of walking and running gait WITHOUT any pain. IF you develop pain, then we understand there might be a link loose in the chain. Otherwise, until there is some kind of reason to address anything, buyer beware when being told your position is why you’re in pain. Pain is far too complex to reduce it down to one singular cause.)

1. Being Aware of Your Balance

A few key components to achieve a neutral resting position (balanced posture) are the following:

1)  Engage your glutes (pelvis rotates posteriorly)
2)  Engage your abs (ribs rotate downward)
3)  Move your shoulders back and down (palms should be touching the side of your legs with thumbs pointing forward)
4)  Tuck your chin backward (like a turtle retracting its head back into the shell or double-chin)
5) Weight distribution (tripod positioning, heel, ball of the foot and outside of the foot)Internal hip rotators

Tension is held in the following: Calf complex, fibularis complex, bottom of feet.
Strength of: TFL, glute medius, glute minimus.

(2024: This is still gold, especially being aware that your ribs rotate in conjunction with your breathing mechanics. I will be exploring this further with more PRI studies)

Keep in mind there is no perfect posture, the best one is a changing one

Keep in mind there is no perfect posture, the best one is a changing one.

(2024: 1000% doubling down here, the best posture is the next one you take on)

2) Strengthening the Hips

My favorite movement to use is the RNT split squat. It works to train both hip and foot muscles in one movement.

Place a band around your knee and have it pull you INTO collapse which will force the muscles to engage harder and thus help groove the motor pattern. You can load it with a dumbbell or kettlebell in a goblet position at chest level for added resistance.

(2024: I still love these for individuals when they have poor spatial awareness during movement. Believe it or not, some people are unaware that they are allowing extraneous movement when they didn’t intend on it.)

Clamshells are a great exercise, big coaching cue is to make sure you aren’t rocking backwards as your open the hips. Think about keeping the hips stacked on top of each other.

Glute bridge variants are fantastic, you can start with the basic two legged bridge and progress to a single leg version, before trying things like marching or incorporating sliders.

  • Improve general glute strength (single leg work like the RNT split squat, clamshells, Glute bridges)

  • Strength in plantar muscles

  • Strengthen dorsiflexion (mainly the anterior tibialis, your shin muscle)

3) Begin Mobilizing and Incorporating gait patterning

Single Leg RDL: Fantastic movement to train the hip in multiple planes of motion. Problem? It’s usually too hard on balance and subsequently a lack of tension in the right places.

(2024: Fun fact, the single leg RDL has one of the highest glute med EMG activation patterns. You can take that and run with it however you’d like.)

Here I’m performing a TRX assist SLRDL where you hinge back, and reach with your arms and hands forward and back. As you go further, you can spread the arms to widen your balance.

Seated 90/90 mobilizations: The full movement might be too difficult for some, you can work on the 90-90 shifts first

(2024: I disagree with this so much, that I am striking it through. Primarily as it disregards a larger point: can your hips even do this? What happens then is a person seeing this, trying to mimic the position instead of trying to understand the larger issue at hand which is the ability to feel proper motion from the correct areas of their hips)

Split stance kneeling adductor mobilizations: Good adductor length is important in maintaining good balance during lower body strength exercises. While it may not directly influence hip and foot dynamics, it can still have an indirect negative effect.

(2024: While I agree with my younger self here, adductor STRENGTH likely matters more than the mobility of your groin area. If you strengthen your adductors at both lengths, it will have a greater carryover to other activities all while increasing your mobility.)

Good ankle dorsiflexion: here is a whole post I made about this before.
First about good foot balance

View this post on Instagram

Foot Position and Improving Hip & Knee Stability - A follow up to last nights post about hip stability, tonight I’ll be tying in our feet to the equation. Our feet have the ability to help us drive up out of a squat or contour as an athlete dynamically cuts through a court or field. Our feet also have the ability to slow us down or decrease neural drive by losing ground contact. - •Our weight should be distributed somewhere between the ball of our foot to the heel. •Too much pronation, or loss of 4 outside toes decreases hamstring recruitment and shifts more onto the quads •Too much supination, or big toe off the ground and we get decreased quad recruitment with more work going to the hamstrings. - So where do you go after you improve intrinsic foot strength and/or hip stability: Loading it via resistance training. One way to check you’re ready for more is to change the angle of your feet - Start feet Straight Ahead •Start with the feet straight ahead, achieving subtalar neutral. •Squat down to a depth while keeping the ankle centered. •You’ll want to watch if the midfoot collapses inward during motion, squat to or beyond your desired depth. - Feet Turned out •Achieve a centered ankle position •Drop down to depth desired •This position is “easier” for your hips but often may come at the expense of foot or back position. In which case I’d argue this isn’t a good position for lifting •Hugely important during almost every sport which requires change of direction. - Feet Turned In •Turn the feet in with the ankle neutral •Drop down while paying attention to positioning of the knee throughout. •Important for athletics (a position many basketball players take off from when dunking) or weightlifting/CrossFit when athlete catch a barbell overhead during the jerk. - “Knees Out!” This is a really common cue. Instead coaches and lifters should focus on their feet. This is key because if your feet are neutral, you will automatically be using your hips to achieve that centered ankle position. Think about using your hips to help in getting to neutral, and often better knee-hip function will follow

A post shared by Gary Heshiki (@garyheshiki) on

551 Likes, 33 Comments - Gary Heshiki (@garyheshiki) on Instagram: "Foot Position and Improving Hip & Knee Stability - A follow up to last nights post about hip..."

Ankle PAILs and RAILs

  1. Start by placing the ankle in as deep of dorsiflexion as possible. Then relax for at minimum 1 minute

  2. Then start by contracting down towards the floor for 10 seconds as hard as you can manage (PAILs)

  3. Immediately without changing positions, try to pull your foot up towards your shin. Even if no movement occurs, continue pulling. It’s all about intent (RAILs)

  4. Then relax into the new end range and repeat 2 more times. You can begin the PAILs contraction once you feel like the tissues have “relaxed”

2024: Ultimately, a lot of this still holds true but I would approach changing anything with some trepidation. Not everyone needs “fixing”, in general the rule of thumb needs to be when there is no problem being reported, don’t go out searching for one. And run the other way if you’re being sold that there is.

Comment

Comment

Why Your Mobility Training Needs to Mirror Your Strength Training

Strength Training = Mobility Training

Are you among the many people who treat strength training and mobility work as separate entities? If so, then you are missing out on a significant aspect of physical fitness. While weight training can help you build strength, treating mobility work as a pre-hab routine can make one susceptible to typical “overuse” injury and pain. Instead, it is essential to recognize the interconnected relationship between mobility and strength and treat them as such.

Remember, one cannot achieve optimal physical fitness by focusing solely on strength-building exercises or by treating mobility as unweighted movements. Without sounding like an infomercial, you’ll be amazed at the difference it can make when you change your approach.

An Example

The New Year is approaching and you hire a personal trainer who teaches you the “correct way” to deadlift.

You get positive reinforcement and continue to increase weight in this specific movement pattern.

One day, you bend down to pick up the barbell and get a twinge in your lower back. You ignore it and finish your workout. The following morning, you have trouble getting out of bed, and sneezing sends you through the roof. You take some time off, figuring poor technique might be have been the cause of this issue. You decide to focus on core strengthening and learn some mobility drills. Finally, things start to settle down and you get back to your regular training routine, but unfortunately, after a year, you experience the same issue again.

This example only considers the frequent bending over one specific line, the environment likely played a role as well. For this example, we’ll keep to a singular focus on mechanical stress across a tissue.

Changing Your Perspective

  • What I described is the hamster wheel so many active individuals find themselves in.

  • When you deadlift (or insert any physical activity), you can only produce force and get stiff in one particular position of +/- 15°. So what happens when you’re mid-lift and you deviate? Well, you are currently exposing your tissues to a new stress, a heavy one at that. Is it any wonder you got hurt when you only allowed yourself to get strong in one line of stress?

  • This phenomenon is known as accommodation. This is defined biologically as a convenient arrangement, settlement, or compromise of our tissues. Our goal as movement professionals should be to prevent internal accommodation. Simply stated, all external-based movement goals will lead to accommodation as they’re a reflection of disorganization at an internal level.

Mobility is your ability to physically get into positions and accurately move in an intended pattern. A pigeon pose decreases low back discomfort like static stretching prevents injuries in runners ( it doesn’t). What all these drills lack is specificity to the demands of loading.
Eg: when performing a stretch at length, you are loading the connective tissues due to the length-tension properties of musculoskeletal tissues tapering off and that tension gets funneled somewhere.

When was the last time you trained this, if ever?

So What to Do?

Ask any strength and conditioning coach, and they’ll be well-versed in periodization (organized training focusing on different aspects of training). But when you discuss the concept of mobility, you get some cookie-cutter bodyweight drills that are supposed to carry over to training. More forward-thinking coaches may use dynamic stretches or plyometric-looking drills.

But where’s the specificity? What drills focus on building qualities of endurance, strength, or power at all tissue levels? Because after the warm-up, you go right into patterned training (eg: deadlift).

If you’re looking to increase your functional mobility shouldn’t you periodically increase the demand? When we focus too much on increasing complexity but not the load (e.g., more tension), we leave a lot on the table regarding our ability to handle stress in our joints out in positions that are considered vulnerable. The human body is a system, and systems theory tells us that for said system (the human body) to handle more, we cannot redistribute the stress but there is a need to build depth (capacity) instead.

If you need help scaling your training to handle the demands of life, click on the button below to work with me online. Together we can go over the concepts to keep yourself running optimally and handle all that life can throw at you.

Comment

Comment

Doing Your First Pull Up

Pull-ups have a way of humbling the strongest of lifters. This is due to the fact that you got to pull your own weight, literally. A lot of people have a huge goal of doing a pull up but many of the programs out either sit behind a pay wall or don’t take into account the importance of screening for pre-requisite movement and the importance of taking a bottoms up approach.

Part 1: Screening the body

  • What does the body need to be able to do and what is required to perform a pull up?

  • Why it matters to manage these issues before embarking on your pull-up journey.

  • What should a finishing position for all back exercises feel like?

Part 2: Training the Core

  • Why it’s important to start from the floor before moving up to the bar.

  • How jumping the gun and beginning with a band assist pull up isn’t the best use of your energy and time.

  • Basic exercises to start with

Part 3: Strength Training

  • Using the finishing positions from part 1 and bringing it all together.

  • Basics of rowing and pulldowns.

  • Tips on manipulating your positioning and tempo to increase effectiveness.

Free Program
Download a sample 3-month program

A few key points:

  • The sets and rep schemes are fairly consistent with how I would program for most individuals.

  • The weight recommendations are just that, a recommendation. If it’s too heavy or too hard, make it appropriate to fit your starting point.

  • Progress appropriately

    • Begin with the core work on the floor.

    • Once you start hanging from a bar, the dead hang and scap pull-ups should start to get easier with minimal swinging.

    • If you get to the isometric holds and negatives, you should be fairly stable. If you look like you’re on a swing, you’ve moved on too quickly.

    • The inverted row is a nice way to manipulate your bodyweight by changing your position while maintaining that isometric hold. It’s analogous to the holds you do hanging from a bar.

    • When doing any of the movements, when you complete the motion, you should FEEL the finishing position. If you don’t feel it, it’s likely too hard.

If you have any questions, feel free to drop a comment or send me a message!

Have trouble figuring this all out? Sign up to work with me online where I’ll design a program centered around your current abilities, gym set up and other goals.

Comment

Comment

Why You Need to Lock Your Knees Out

Lock your knees out. Especially when you lift!

But have you heard the advice that you shouldn’t lock your knees out because it’s bad for you? Ever wonder why that is?

This myth has origins in stories of soldiers standing at attention for hours on end only to end up fainting as they had their knees locked out. It was postulated that this was due to compression of the popliteal artery (a branch from the important femoral artery).

Secondarily, this also centers around old beliefs about arthritis and how excess wear and tear might cause a breakdown. Instead, researchers now are finding it may not be a disease of breakdown but rather uncontrolled local inflammation in the knee joint. (1)

Screw-Home Mechanism

The screw home mechanism is an integral part of ensuring good knee stability. For most healthy individuals this is something you don’t think much about. However, for anyone with prior operations or lingering anterior knee issues, this is an important concept to understand around general knee function.

The medial condyle is 1/2 in. longer than the lateral condyle. This allows the femur to screw home when fully extended and this stabilizes the knee joint. This is an essential aspect of being able to walk and support yourself during the swing phase (Standing on one leg while the other one swings through).

The movement of internal rotation of the femur on the tibia associated with the later stages of extension of the knee constitutes a locking mechanism, which is an asset when the knee is subjected to strain.

In general, it works like this:

  • Closed chain (like squatting) the femur moves on a stable tibia (shin bone). (2)

    • The Femur rotates externally to unlock the tibia.

    • The femur rotates internally to lock on the tibia.

  • Open chain (like a leg extension) where the tibia moves on a fixed femur. (2)

    • Tibia internally rotates to unlock

    • Tibia externally rotates to lock

I Don’t Have Knee Problems…Why is This Important?

  • Most knee problems occur at the terminal extension with a lack of VMO function. Ah, for some, I’m sure you recognize the VMO, this is why so many coaches prescribe terminal knee extensions. Why isolate one motion when you can easily train this whenever you hit leg day!?

  • As you flex your knee, the PCL relaxes and the ACL is tightened. The reverse is true, as you extend your knee the ACL tightens and contributes to stability while the PCL relaxes(3). Seems important to ensure these structures are exposed to stressors so they can improve stabilization (albeit minimally).

  • If you lack terminal knee extension, you will likely rely on a few strategies.

    • Think of an elderly person who shuffles their feet. They can’t lock their knee out, therefore, decreasing the amount of time they stand on one leg during the gait cycle. So they shorten that time by shuffling their feet instead.

    • You can’t lock your knee out, you either walk with more flexion and increase stress on other structures or you walk with some limp. A limp also increases the reliance on other structures, namely your hips to help keep this show running.

  • This is why you may not need to squat “ass to grass” but you do need to expose your knee to deep flexion to end-range extension. Pain-free deep flexion tells our brains via our receptors in the deep knee capsule stuff to maintain these structures. This in turn supports our ability to access such positions.

    The easy take-home is to do leg presses or lunges maybe. It doesn’t have to be heavy, it just needs to be deep.

Comment

Comment

Capsular Constraint Mechanism: Why It May Pinch When You Rotate Your Joints

Capsular Constraint Mechanism

Why it might pinch when you rotate your joints.

Photo by Otto Norin on Unsplash


I sat down at a Functional Range Conditioning seminar in late November 2017 and heard a concept that fundamentally changed the trajectory of my career.

If your capsule is restricted you can’t rotate, you don’t have a joint.

It took me some time to truly understand what Dr. Spina meant by this. In time as I went about training humans and assessing joints, it clicked the more I learned about the FRS system.

The statement above doesn’t mean you’re having some arthroplasty, rather your joint doesn’t have access to all its degrees of freedom.

In plain English: You’re lacking control in the range of motion your joint should have available to it.

Capsular Constraint Mechanism

Let's use your shoulder joint.

The capsular constraint mechanism states that a tight capsule around the humeral head shifts the direction opposite to the tightness being produced(1). An analogy that helped me understand this is that the joint capsule is like a stress ball that encloses the space between two bones, so as you rotate in one direction, the opposite side needs to accommodate for that.

Applying this to a real-world example. Let's say you’re getting ready to back squat and you set your upper traps under the metal barbell and grab it on both sides as you externally rotate underneath only to feel this pinching sensation on the back side of your shoulder.

“Must just be tight back there”, so you grab your foam roller or lacrosse ball. You roll on the thing for a few minutes and your posterior shoulder feels “looser”. You get back under that bar, pinch! It’s because you’re chasing the symptom and not the root cause.

This makes sense when you look at a dissection of the shoulder, your rotator cuff tendons all blend into the joint capsule. (2) If we lose the ability to rotate, there’s a solid chance your “tight muscles” can’t be stretched or massaged because your problem isn’t only muscular, it’s capsular. When the capsule lacks the space to accommodate the movement, you get that pinching sensation.

It’s all in your brain…kind of

Why does this happen? A little anatomy to help explain this.

Model of spinal nerves

Photo by CHUTTERSNAP on Unsplash

In your shoulder, you have your labrum and the next piece of tissue is your joint capsule. The capsule contains mechanoreceptors that sense the world around you and sends that information up to your brain.

In general, sensory information is relayed to an interneuron at the spinal cord before it is either remedied through a reflex or sent up to your brain where it’s sorted to the proper areas before kicking the signal back down to your muscles.

We have 4 types of mechanoreceptors that relay information about what’s going on. The joint capsule contains type 1 and 2 receptors.

Type 2 receptors (Pacinian-like or Krause corpuscles) skip that step at the interneuron and travel right up the spinal cord and report directly to the brain. This means your capsule senses movement long before your muscles do!

Now, why is this important?

Well, if we understand that mechanoreceptors sense information about our movements and our movements aren’t very good. Then the information relayed to the brain is that of aberrant movement. Over time, the nervous system interprets this as your new normal and you end up with poor length-tension relationships for your muscles. (3)

This ultimately leads to changes in your joint capsule space (not good) because based on the information your movement gave the brain, it interpreted that you didn’t need all the available workspace.

So, if we know that joint capsules will ultimately restrict our movements and the joint capsule of the shoulder is intimately tied to the rotator cuff, shouldn’t you maintain rotation as much as you can? (the answer is yes, you should)

So what about that pinchy shoulder?

>

This applies to both internal and external rotation, assuming you don’t have some more serious injury like a labrum tear or ligamentous sprain.

  • When you rotate your shoulder externally, you will inevitably reach that pinch point. Back out of that position a little bit.

  • Find an object and rotate externally and try ramping up isometrically to as strong of a contract as you can maintain. Hold for about 10 seconds.

  • When you externally rotate further, I’m willing to be your shoulder magically has both more ROM and no pinch, at least not at the position you initially felt that.

  • Repeat until you get to your desired end range.

Conceptually, the same process applies to internal rotation.

Long-term-wise, training with the intent to maintain end-range rotation training is key to keeping joints healthy.

References:

  1. Kim Y, Lee G. Immediate Effects of Angular Joint Mobilization (a New Concept of Joint Mobilization) on Pain, Range of Motion, and Disability in a Patient with Shoulder Adhesive Capsulitis: A Case Report. American Journal of Case Reports. 2017 Feb 10;18:148–56.

  2. Witherspoon JW, Smirnova IV, McIff TE. Neuroanatomical distribution of mechanoreceptors in the human cadaveric shoulder capsule and labrum. Journal of Anatomy. 2014 Jul 9;225(3):337–45.

  3. Ganguly J, Kulshreshtha D, Almotiri M, Jog M. Muscle Tone Physiology and Abnormalities. Toxins. 2021 Apr 16;13(4):282.

Comment